Quantcast
Channel: Moates Support
Viewing all 191 articles
Browse latest View live

Ford Tuning: Getting Started with Moates Hardware

$
0
0

Chapter 1: Introduction, Overview and Summary

Questions you may have coming in:

  • How do I determine what is needed? Keep reading!
  • What vehicles are compatible? Hardware will work with all 2004 and older Ford vehicles with a J3 port, depending on software support.
  • What are the capabilities of Moates hardware? Realtime tuning, logging live data, burning chips, switching between multiple programs
  • What hardware and software options are available, and at what cost? Keep reading!
  • How do I learn to tune EEC? What learning resources are available? Keep reading!  We’ll provide references.

Vehicle Compatibility

  • Hardware is compatible with all year/model Ford vehicles that have a J3 port.  This generally covers 86-2004 model years.
  • If you already have a binary file (bin) or hex file (hex) that is tuned for your vehicle. you can use one of our chips.
  • If you need to make changes (tune) to get your vehicle where you want it, you are limited by software support.
  • Some ECMs are simply not supported in software that works with our hardware because of lack of definition information.
  • It’s important to check for software support before purchase. If you have an uncommon vehicle (for example, a 1995 Festiva) you may be out of luck with our products.
  • We need certain information to tell if your vehicle is supported. (clickEmail us to check before purchase!

Overview of Tuning Process

  • Determine your target vehicle boxcode and strategy.
    • The Boxcode is typically a 3 or 4-digit letter/number code on the EEC computer. ( ‘A9L’  or ‘T4M0’ for example)  This represents a calibration for a particular engine/transmission using a particular strategy.
    • A Strategy is the set of procedures that the ECM follows to run an engine.  Combined with a calbration, this determines how the engine will operate.
      • The strategy will determine things like whether a MAF or MAP sensor is used, how spark and fuel are calculated, how idle is controlled, etc.
      • Each strategy needs a definition (or ‘def’) to work.  The definition tells the software how to interpret the binary and display it in a format you can understand with tables and real-world values.
      • For instance, the A9L boxcode, belongs to the GUFB strategy.  The A3M boxcode also belongs to the GUFB strategy.  You can change a bunch of parameters on a A3M computer and have it run 100% identical to a A9L computer.
  • Review your software options in terms of availability.
    • First: figure out which software supports your box code.  Support varies from package to package.  Check with each software vendor for the most up-to-date supported options.
    • Next: download software and install it.  You can check out the interface and features at this time without paying for anything.
    • Finally: After you have found a software package with an interface that you like which supports your strategy, go to our web store to purchase.  You will need to have already installed software prior to purchasing in order to provide us with information to license it.
  • Determine your tuning needs to guide your purchases.
    • Do you just need to burn chips?
    • Do you want to be able to make changes while the vehicle is running? (emulation)
    • Do you want to be able to log vehicle parameters while the engine is running? (datalogging)
    • Do you want a more accurate measure of the air/fuel mixture? (buy a wideband)
    • Decide what capabilities you need and then purchase hardware as appropriate.
  • Install hardware.
    • Clean that J3 port PROPERLY!
    • To clean the J3 port, you generally must remove the case from the ECM, gently rub the J3 port with Scotchbrite or a mildly abrasive kitchen scrubber.  (‘mildly’ is important – you do NOT want to rub hard enough to remove the copper traces from the circuit board!)  A final clean with brake clean, starting fluid  or another mild solvent doesn’t hurt.  A properly cleaned J3 port will have a very, very slight crosshatch visible on the ‘fingers’ of the connector.
    • Golden rule: ALWAYS TAKE THE KEYS OUT OF THE IGNITION (CAR OFF!!!)  WHEN INSERTING OR REMOVING THINGS ON THE J3 PORT. Failure to do so can result in a fried ECM, fried chip/QuarterHorse or both.
  • Install USB drivers
    • The same USB drivers are used for all Ford products
    • USB driver is a free download from the webstore, it comes with config instructions. (download)
    • If you need more visual directions, there is an install guide available on the Moates support site.
    • If you have trouble with the install, there is troubleshooting guide available on the Moates support site.
  • Setup software and perform initial configuration
    • Establish communications, check settings – this procedure will vary depending on software package you are using.
    • Select the appropriate strategy for your box code and load any appropriate definition files.
    • Program hardware with a calibration to serve as a starting point.  A stock tune with a few key parameters modified to suit the vehicle at hand is great.  You’re just looking for something good enough to get the car to fire and (hopefully) idle.
    • If you are datalogging, select and configure datalogging payload matrix (PIDs) – i.e. what you’re interested in monitoring.
  • Gather performance data, analyze it, and make changes toward an optimized result.
    • Parameters are gradually adjusted to achieve desired targets.
    • This is an iterative process, where adjustments are made and the results are evaluated followed by further adjustments.
    • Please see our subsequent chapters on Ford Tuning (available separately).
      • Basic Tuning Techniques and Common Examples
      • Advanced Tuning and Tricky Combinations

Chapter 2: Hardware Selection and Installation

Several types of hardware are available and needed depending on desired functionality.

Laptop PC

  • Windows XP/Vista/7 are all compatible with the Ford tuning software.
  • Something 5 years old or newer is recommended (no old 486 machines!).
  • Internet access is recommended to facilitate licensing and software installations.
  • USB ports (at least 1) are required. All needed cables are included with the hardware.
  • If logging wideband, a serial-to-USB converter may be needed. ($37 on our webstore – link)
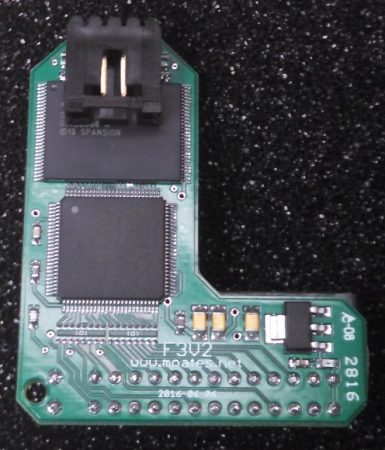
F3 Chip modules

  • These modules install onto the J3 port of the EEC box.
  • One per vehicle, $60 per unit – link.
  • J3 port MUST be thoroughly cleaned, both sides, before installation!
    • Disassemble case, scrape off coating with non-metallic scraper or fingernail.
    • Clean both sides with Scotchbrite, not sandpaper.
    • Don’t be too rough, just polish it to a nice crosshatch, not down to the copper.
    • Clean with paper towel and alcohol or toluene.
  • Two-position switch capable with user-added toggle.  Directions for switching are on support site.  (link)
  • Reprogrammable many times using Jaybird.

Jaybird mini-USB chip reader/writer

  • Small size, low cost, $75 – link.
  • Allows reading and writing of the F3 modules.
  • No datalogging or emulation with the Jaybird. No EEC box reading.  Most basic chip programmer available.

Quarterhorse Realtime Emulator and Datalogger

  • Hardware unit is $249 – link.  All cabling is included, along with ferrite shields and USB bulkhead connections.
  • Optional rotary switch ($30 – link) can be used to select from several different programs on the device, switching on-the-fly.  Works for EECIV ONLY.
  • Fits onto J3 port like a chip module –  port MUST be clean as with F3 modules.
  • On some early EEC boxes, several components will need to be gently bent out of the way for clearance during installation.
  • The Quarterhorse is an integrated unit that can do several things:
    • Realtime Emulation
      • Changes in the calibration take effect immediately while engine is running.
      • No disturbance in engine operation or communications.
      • Changes in software are synchronized on the Quarterhorse.
    • Datalogging
      • Requires special definition file with ‘patch code’ written for the QuarterHorse, allowing RAM on the EEC to be shadowed onto the Quarterhorse.
      • Unprecedented access to variables and sensor values through the QuarterHorse without additional datalogging hardware.
      • Logging rates in excess of 5 kHz possible.  Most software logs around 20 Hz, which is great for tuning.
    • EEC Reading
      • EEC must be installed and powered in-vehicle with QH installed.
      • You can read the tune from the EEC box and save it to file.
      • This can be done with a stock EEC to acquire the base calibration.
      • You will be able to harvest the active calibration that has been programmed with a flash programmer this way.

Burn2 with F2A and F2E adapters

  • The Burn2 ($85 – link) is a general purpose chip programmer that can be used for many different devices.
  • When used with the F2A adapter ($10 – link), it can be used to read/write F3 modules.
  • If the F2E adapter is added (another $10 – link), you will be able to read EEC boxes.
  • No emulation or datalogging – this is a simple chip programmer only.
  • This hardware combination is best suited for people that plan to tune vehicles from many different manufacturers.  If you plan on tuning exclusively Fords, consider the Jaybird as a less expensive alternative.

F8 chip module with Destiny programmer

  • No emulation or datalogging – this is a simple chip with switchable tunes.
  • Available exclusively through our distributor DP Tuner
  • The $165 F8 module holds 8 switchable tunes and can be reprogrammed in-vehicle without removing the chip from the EEC!
  • The $150 Destiny programmer is used with a 4-pin switch cable while F8 module stays installed on EEC.
  • Once programmed, the $30 rotary switch can optionally be connected as a calibration selector.

Wideband O2 Sensor and Controller

  • Used to sense your engine’s Air-Fuel ratio through exhaust gas analysis.
  • Units such as the Innovate DB-Red LC1 Gauge Kit /w/ O2 ($209 – link) are very affordable.
  • Software (discussed separately here) supports direct logging of the Innovate device data using a serial interface.  This is the preferred method of logging wideband data because it avoids all the pitfalls of using analog signals.
  • Analog outputs from the wideband (such as the LC1) can be connected directly to the EEC in some cases (unused EGR pin on A9L for example).
  • Wideband O2 readings critical for tuning fueling parameters.

Chapter 3: Software Selection, Installation, and Licensing

Several different software packages currently work with our hardware.  Cost varies considerably considerably from package to package along with capabilities.  Each software package also has its own unique flavor of interface – you will probably like one better than another.  Luckily, you can download and check them out prior to purchase.  Also remember that support for various box codes / strategies varies considerably from package to package.  It is important to investigate not just whether there is ANY support for a particular strategy but whether the items you require to tune your vehicle are supported – definition files vary considerably from software to software.  Fortunately, the availability of ‘trial’ versions makes it possible to ensure you to find a software package that fits your needs without having to purchase each one.

Binary Editor ( http://www.eecanalyzer.net )

  • Written by Clint Garrity.
  • Currently has the largest user base.
  • Cost is $80 for the base application which is registered to a specific PC.
  • Includes many of the most common and popular definitions (GUFB, etc) with no additional cost.  ( this list has almost all the “free” definitions along with some pay defs )
  • Other ‘premium’ encoded definitions available at extra cost ($50-150+) from the definition author.
  • Tends to benefit from a faster/newer laptop. Code is a bit heavy, so older PCs are taxed.  Think 2Ghz P4 / 512Mb ram realistic minimum.
  • Includes EEC reading, chip reading and burning, datalogging, and emulation capabilities when used with the appropriate hardware.
  • Also includes logging for wideband (Innovate, PLX, etc).
  • Also includes optional support for standalone dataloggers, J2534 interfaces.
  • Companion software EEC Analyzer is available for an additional $50. Not necessary, but it helps with data interpretation.
  • Licensing occurs after you install the software from the available downloads, through a menu item within the BE and EA software programs.
  • Both BE and EA licenses can be purchased from the webstore with information from the program.  See webstore product page for further instructions.

EEC Editor ( http://www.moates.net )

  • Written by Paul Booth.
  • Fairly lightweight software – does not require a very fast PC to work well.
  • Cost ranges from $20-65 for each strategy depending on options.
    • EEC-IV is $20 for editing DEF (emulation and chip burning) plus $25 for datalogging (DLM) .
    • EEC-V is $10 more ($30+$35).
    • In order to have a comprehensive tuning solution for a typical fox body Mustang, you would need to order the GUFB def ($20) and the GUFB DLM ($25) along with a QuarterHorse.  This would allow you to tune any number of vehicles using the A9L, A3M, etc. processor codes.  You can also burn chips with the Jaybird/BURN2+F2A for any strategies you have purchased.
  • Includes logging for Innovate Wideband (LC1, LM1, etc) at no additional charge.
  • List of available supported strategies is listed on the webstore.

TunerPro RT v5 ( http://www.tunerpro.net )

  • Written by Mark Mansur.
  • Software license is optional (nag screen) but encouraged for $30.
  • Editing portion of software *extremely* lightweight – can run well on older PCs.  Parts of logging engine considerably more demanding.
  • Many definitions are available for editing only, see Tunerpro.net and our website for details.
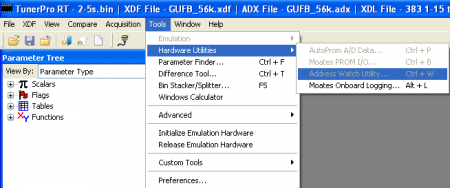
  • Editing, chip burning and emulation are supported by TPRT V4 and TPRT V5.
  • Datalogging using the QuarterHorse is supported by TunerPro RT V5 via new the ADX format.  See here for updated definitions.
  • QuarterHorse vehicle support is very limited compared to other software, but some of the most popular ones (GUFB CBAZA etc) are well-developed and available at time of writing (December 2010)

Flash & Burn Interface ( Moates/TunerPro )

  • This is a low-level utility for reading and writing F3 chip modules using Jaybird or  BURN1/BURN2 + F2A
  • Capable of reading EEC boxes using BURN2+F2A+F2E.  Does not work with QuarterHorse
  • If you have a raw binary file ( bin ) you can use Flash n Burn to program a F3 chip module
  • No cost, can be downloaded from the webstore.

F8 Destiny Utility ( http://www.moates.net )

  • For use with a Destiny and F8 multi-position in-situ chip module.
  • Allows easy management of stacks of tunes on the module with PC-based selection.
  • No cost, can be downloaded from the webstore.

USB Driver ( Moates.net / FTDI )

  • Needed to allow PC to communicate with the USB hardware (Quarterhorse, Jaybird, BURN2, etc).
  • In many cases, working drivers will be detected by Windows via plug n play.
  • If you need more visual directions, there is an install guide available on the Moates support site.
  • If you have trouble with the install, there is troubleshooting guide available on the Moates support site.

Chapter 4: Suggested Techniques for Effective Calibration of EEC Systems

Vehicle Inspection and Preparation

  • CRITICAL part of the tuning process. Start here, really.  If you fail here, you will never succeed.
  • Several areas of the vehicle should always be analyzed before you begin the effort.
    • Smoking – learn to identify fuel (black) vs. oil (grey-blue) vs. coolant (white/sweet smelling).  You cannot fix oil smoke or coolant smoke with a tune.
    • Compression – you should have all cylinders within 10% compression of each other.  If smoking, damage to old spark plugs or general appearances make you suspicious of the motor’s health, check it before you start.  It’s a lot easier to deal with a motor with poor compression BEFORE you beat the snot out of it in the course of tuning it.  Many people skip this but it is something to think about because a motor that is already hurt is very likely to blow up or experience a catastrophic failure during tuning.
    • Check base timing, adjust as needed. (all vehicles with a distributor)
    • Evaluate TPS voltage.  Minimum/maximum values should be within acceptable limits.  Check for reversed wires – voltage should increase as throttle opens.
    • Look at MAF intake routing, make sure there are no obvious vacuum / intake leaks between the MAF and the intake valves.  Think cracked/split/loose hoses, bad gaskets, open ports, dry rotted couplers, hoses connected both before and after the MAF, …
    • O2 sensors should be operational without any exhaust leaks before the sensors.  For some reason, cut and soldered “extensions” for long tube headers often cause problems.  Plug and play extenders are *highly* recommended.  If you know that you do not have proper stock O2 sensors, REMEMBER TO TURN OFF O2 FEEDBACK!!!
    • If you are using a wideband sensor, you need to make sure there are no exhaust leaks before the wideband.  Flex tubing, poor joints between headers- midpipes and cracks in tubing can all create havoc.
    • If applicable, pay attention to which bank the wideband is installed in – bank-bank differences can be a powerful diagnostic tool.  Pay attention to how far the wideband is from the engine’s exhaust ports – there is always some lag between combustion events and measurement.  When things are changing quickly, this is critical.
    • Widebands need calibrated periodically, generally in free air.  Wideband sensors need replaced periodically.  Leaded fuel kills them very quickly.  Proper care and feeding of widebands is crucial to their effectiveness.
    • Be aware of catalytic converters.  Always tap them (GENTLY) and listen for suspicious noises that would indicate a catalytic converter that is degrading.  Clogged cats can rob literally hundreds of horsepower.  It is possible to place a wideband sensor AFTER a catalytic converter but remember that the cat will very slightly skew readings.
    • Make sure you have enough fuel pump and injectors for the power level you are looking for.  For a V8, “Injector size in #/hr * 14 = max hp” is a crude rule of thumb.  There are tons of injector calculators to be found if you want a better idea.
    • Ensure that fuel pressure is sane.  40psi with no vacuum reference is generally about where most OEM regulators are set.  You should be able to see a difference in fuel pressure between key-on-engine-off, idle and blipping the throttle.  Fuel pressure should be lowest when vacuum is highest.  Fuel pressure should increase when you blip the throttle as manifold pressure increases.
    • You need a MAF capable of metering enough air for your power goals.   There are ways to increase the metering capacity of a given meter, but tuning that properly is an advanced topic.  Keeping it simple: get a meter that can handle your airflow needs.
    • You need a functioning alternator and battery.  Battery voltage plays a role in crucial things like injector opening time and coil charge duration.  If your charging system is not functioning correctly, your tune may drastically change if/when you fix it.  Rule of thumb: if your battery voltage ever drops below 13 volts with the motor running, you will run into trouble.
    • On a similar note, underdrive and overdrive pulleys can cause real issues.  Pay attention if you see them.
    • Check for emissions hardware ( purge, smog pump, EGR, etc. ) that is missing.  In many cases these items can be disabled but you need to pay attention to what is present compared to what the ECM expects.
    • Basic maintenance should not be overlooked.  If it is important for a “normal” car it is twice as important in a performance application.
      • Spark plugs: correct heat range, appropriate gap, not fouled.  Consider power level, fuel and ignition system.  AVOID PLATINUM PLUGS FOR PERFORMANCE APPLICATIONS!!!  Copper or iridium will serve you much better.
      • Plug wires: no cracks/arcing, properly crimped ends, appropriate length so there isn’t too much tension
      • Firing order: firing order is determined by the camshaft (mostly) not the block or computer.
      • Spark boxes: great for distributor engines, unneeded/problematic for mod motors
      • Coil packs: Coil-per-cylinder (99-04 generally) applications like ***OEM*** coils best. (according to Dave B.)  MSD, Accel, Granatelli, … are all cause for concern especially with boost.
      • Oil and coolant: always check fluids before starting.  Quick check, potentially horrible consequences if low/out.
      • Fans / overheating: it is always a good idea to check that radiator fans work.  A car that overheats cannot be tuned.
      • Belts and Idlers: All serpentine belts must be in good shape.  Cracks, missing ribs, etc. will all cause problems.  Any idler pulleys must spin freely.
      • Tension:  Belt Tensioner should not be extended fully with the engine off.  Adjust belt length so that tensioner is in the lower third of its adjustment range with the motor off.  (i.e. it can move 2/3 through its range to increase belt tension – it should be mostly compressed when motor idle)  This is particularly important for supercharged applications.
      • Fuel filter: Fords are *horrible* about clogging fuel filters.  Especially if the car has been sitting for any significant period of time, change the fuel filter.  Motorcraft/OEM filters seem to hold up better than many cheap aftermarket ones.
      • Fuel age and type: Gasoline degrades with time.  Do not expect fuel that is more than a month or two old to be of the same quality as fresh gas.  Be particularly careful with heavily oxygenated fuels (i.e. VP Q16) and alcohols (ethanol, methanol, E85, etc.) in contact with fuel system components for large periods of time.
      • Clean air filter and MAF.  Oiled filters generally cause MAFs to get dirty.  Clean MAFs only after they have had a long time to cool – hot MAF+liquid=death.  Clean *GENTLY* with brake clean, starting fluid, or other organic solvents.
  • Remember, you can’t fix mechanical or electrical issues by reprogramming the ECM!!! The results you achieve with tuning will only be as good as the material you start working with.  Garbage in, garbage out.

Datalogging: What’s important and what does it mean? What should we be interested in? What to select?

  • There are certain sensors that you will almost always want to keep an eye on because they are critical to engine operation:
    • RPM – how fast the motor is spinning
    • MAFV / MAF counts – a “raw” value representing the reading from the MAF sensor
    • Airflow – a value calculated  by the ECM from the raw sensor MAF voltage that represents how much air is being ingested by the engine.  This is often represented in some form of “real world” value, like Kg/hr or Lbs/min
    • Load – from 94-2004 “Load” is the main factor involved in determining spark advance.
    • Spark Advance – when the ECM is commanding sparks to be fired.
    • TPS – Throttle Position Sensor.  How far open the throttle is, i.e. how hard you’re pressing the gas pedal
    • ECT – Engine Coolant Temperature(how hot or cold coolant flowing through the engine is)
    • IAT – Intake Air Temperature (how hot or cold air entering the engine is)
  • Depending on what you are trying to do, there are other items you may want to pay attention to as well.
    • Injector Pulsewidth – How long the injectors open.  This can be useful both for “sanity checking” and to ensure you do not run out of injector – there is only a fixed time available at a given RPM to fire injectors.
    • HEGO1/2 – Heated Exhaust Gas Oxygen sensor.  Measures the presence or absence of oxygen in the exhaust in order to try to determine whether the motor is running rich or lean.   Watching the raw HEGO voltages can give you some kind of very basic indication of fueling.  These sensors experience a large change in voltage in a very small area centered around a stoichiometric mixture ( 1.0 lambda or about 14.7:1 Air-Fuel Ratio or AFR)
    • STFTs – Short Term Fuel Trims.  These are IMMEDIATE changes the ECM makes in response to HEGO readings in order to steer the air-fuel mixture towards desired targets.   If your EEC uses STFTs effectively (i.e. all modular motors) then these are generally more effective as a tuning tool than looking at raw O2 voltages.
    • LTFTs – Long Term Fuel Trims.  These are the long term difference between programmed values and target values.  Think of them as the average of STFTs over a long time.  If your EEC uses LTFTs effectively (i.e. all modular motors) then these are one of the most effective pieces of data provided by the stock computer for tuning fueling.
    • WBO2 – Wideband Oxygen meters can measure a much wider range of rich-lean conditions than standard HEGOs.  Having wideband data is often preferable to HEGO/STFT/LTFT.  In many cases (i.e. 86-95 in my opinion) it is often easier to disable closed loop operation/the O2 sensors completely and tune the car exclusively using a wideband.
    • ISC Integrator (‘integrator’) – this represents the difference between how much air the EEC is using to hold and idle versus how much it is commanded to hold in the tune.  Critical for proper tuning of larger camshafts and larger displacement engines.
    • Boost/MAP/Pressure – Although MAF systems do not differentiate between boost and vacuum, it is often very handy for sanity and safety to have an idea of how much pressure there is in the intake manifold.  For positive displacement blowers (roots, TVS, twin-screw) make sure you take pressure readings AFTER the blower on the lower plenum.
    • Pressure drop across injectors / FPDM duty cycle – most 99-04 cars control fuel pressure electronically.  These values are critical to a properly operating fuel system on these vehicles.

Recalibration: Modifying Parameters and Values to Achieve a Target

  • First step: decide on target operating parameters for the engine
    • This may seem obvious, but something as simple as “make the most power” or “improve fuel economy” isn’t going to be be enough.
    • Second step: take a general goal like “make the most power” and decide on appropriate engine conditions to achieve that goal.
    • If you read these rules of thumb and say “this isn’t right for my engine” – GREAT.  You already know more than the audience these rules are aimed at.
      • If in doubt, “0.8 is great” – blatant simplicity.  Quoted me to once by someone who did OEM calibrations for Honda for a living.  It is very difficult to break anything due to fueling from running a vehicle at 0.8 lambda (about 11.6:1 AFR Gasoline)
      • 1.0 Lambda represents a stoichiometric mixture – exactly enough oxygen is present in the air to burn all the fuel supplied.  This is normally the best mixture for minimizing emissions.
      • Most vehicles make best power around 0.85 to 0.88 lambda (12.3 – 12.7 AFR Gasoline) – slightly richer than stoich
      • Most vehicles achieve best fuel economy at around 1.05 to 1.1 lambda ( 15.2 to 16.0 AFR gasoline)
      • Most vehicles need more ignition advance as RPM increases
      • Most vehicles need more ignition advance under cruising/low-throttle conditions than WOT
      • Knock is most likely close to peak torque, at high loads/low RPMs or at peak horsepower
  • Next step: Get familiar with the strategy your vehicle uses.  Fueling, timing, idle, open-closed loop and just about everything else vary considerably from one strategy to another.  Being familiar with the strategy your ECM uses will help you figure out which tables to modify to acheive the results you seek.
    • eectuning.org is a good place to learn more.
    • the ‘Education’ section of moates.net is another good place to get information
  • After you figure out where to look: set up what you can based on what you already know
    • Setup Engine Displacement / displacement of one cylinder
    • Setup injector size
    • Setup a reasonable rev limiter based on what you know of bottom end and valvetrain
    • Setup a reasonable (perhaps a little high to start) value for target idle
    • Setup a reasonable base calibration for MAF sensor.  If sensor came with a calibration sheet, this would be great time to use it.
    • Setup a reasonable target air fuel while in open loop
    • Setup a reasonable timing map.  A stock timing map adjusted for mods is always a good place to start.
    • Setup a reasonable pattern from switching from closed loop to open loop.
    • Enable or disable hardware such as O2 sensors, EGR, Purge/Evap, automatic trans
    • If you take your time to create a sane starting point before you turn the key on you will save yourself countless hours of time!
  • Finally: Start your engines (and your datalogger) and make final adjustments
    • Are air fuels not matching what you command in open loop?
      • Three pieces of the fueling puzzle:  MAF transfer, Injector slopes(size), Injector offset (battery compensation – latency)
      • How do you tell what is going on?  STFTs, LTFTs (if O2s are enabled) combined with a wideband.  STFTs/LTFTs are great while O2s are active – i.e. part throttle
      • Leanest at idle, small pulsewidths but perfect at WOT/higher throttle -> increase battery offset
      • Lean – rich – lean patches as you gradually increase throttle -> wrong shape of MAF curve.  systematically tune it
      • Entire range of engine operation uniformly off from commanded values -> either injector slopes (size) or entire MAF transfer function is off.  Let load determine which one to multiply/divide in order to fix things
    • Idle issues?
      • Make sure your MAF transfer table, injector slopes and injector offset are sane before trying to fine tune idle!
      • Follow the integrator – a good place to start is to add the integrator (or subtract if it is negative) from the Neutral Idle Air table (in neutral) or Drive Idle Air table (if in Drive for automatic cars)
    • Performance
      • ALWAYS TUNE FUELING FIRST BEFORE TACKLING TIMING!  You are *much* more likely to break your engine if your mixture is wrong.  As long as your timing is good enough to light the mix, you can tune fueling adequately.
      • Tuning timing without a dyno is hard.  Accelerometers and a dragstrip can provide crude but repeatable feedback.

Data Analysis and Evaluation

  • Once captured, the operational data can be analyzed and used to guide calibration effort.

(More to come!)

(below this line is draft / coming soon as of 2010-11-30)

Chapter 4:  Software/Hardware Initial Configuration with Tuning Session Start-Up Examples

  • Physical installation of hardware is shown in more detail from Chapter 1 overview.
    • F3
    • Jaybird
    • Quarterhorse
    • F8/destiny and switch
    • Wideband
  • Installation, licensing, initial configuration, and detailed hardware synchronization procedures for each software are explained and examples detailed. Initial basic calibration load-up for different hardware, as well as basic payload creation for datalogging, are explained and illustrated for each.
    • USB Driver
    • BE/EA
    • EEC Editor
    • TunerPro RTv5
    • Flash & Burn
    • F8/Destiny Utility
  1. Data Analysis and Evaluation
    1. Once captured, the operational data can be analyzed and used to guide calibration effort.
    2. Several examples of logged data values and how they relate to calibration parameters are provided.

Chapter 6:

Case Studies: Example Modifications, Vehicle Combinations, and Rules of Thumb

  1. Key Issues and Vehicle-Specific Examples
    1. How do many of the popular modifications on these vehicles affect the tuning approach?

i.      Bigger MAF

ii.      Bigger injectors

iii.      Cold plugs

iv.      Nitrous

v.      Gears and converter

vi.      Auto vs Manual

vii.      Emissions delete / racing modifications

viii.      Cam, heads

ix.      Headers/exhaust

x.      Cold air intake

    1. We look at a walk-through of important considerations and the thought process of tuning several different example combinations, with real-world dyno results.

i.      A9L/GUFB Fox Body, 1993 N/A 331 stroker, 24# injectors, cam, headers, 5spd.

ii.      CBAZA, same as above.

iii.      03/04 Mustang

iv.      SC A9L

v.      SC 03/04 Cobra

vi.      F150 Truck

    1. Achieving an Optimized Result: When is it good enough?

i.      What are your goals?

ii.      Do you plan for future modifications?

iii.      Rules of thumb for AFR and timing, NA vs boost.

iv.      What is safe vs aggressive?

>

>

>

> Vehicle Compatibility

>

> All year/model Ford 2004 and earlier with J3 port are compatible

***with our hardware*** but there may not be software support for particular models.

> Some vehicle year/model applications are simply not supported in the

> software because of lack of definition information. It’s important to

> evaluate the availability of your desired application as ir relates to

> the software selection process. You may be out of luck (for example,

> 1995 Festiva or such uncommon target).

http://support.moates.net/ford-strategies-supported/

http://support.moates.net/ford-box-code-strategy-cross-reference/

>

>

>

> Overview of Tuning Process

>

> Determine your target vehicle boxcode and strategy

>

>                                                                i.

> Boxcode is typically a 4-digit letter/number code on the EEC computer.

> This is the calibration code.

http://support.moates.net/ford-information-we-need-to-help-you/

>

>                                                               ii.

> Strategy is the ‘parent’ definition structure to which a boxcode belongs.

Each strategy is the set of procedures that are executed on your ECM to run an engine.  Sometimes more than one strategy can successfully run on a given ECM.  Normally we do not make many changes to the procedure part of strategies while tuning vehicles.  Instead, we change tables, functions and constants so that the engine receives what it needs to run well.  Each “box code” represents a configuration of a particular strategy for a particular engine.

>

>                                                             iii.

> For

instance, the A9L boxcode  belongs to the GUFB strategy.  The A3M boxcode also belongs to the GUFB strategy.  If you compare A9L.bin and A3M.bin the files will be almost identical because they use the same strategy but are configured for different vehicles by Ford.  If you get a definition (also called def) for the GUFB strategy, you will be able to edit both A9L and A3M binaries because they use the same strategy.

……….

>                                                             iii.

> J3 port MUST be thoroughly cleaned, both sides, before installation!

***IMPORTANT***

……………….

> Chapter 5:

>

> Suggested Techniques for Effective Calibration of EEC Systems

>

>

>

>

>

> Vehicle Inspection and Preparation

>

> CRITICAL part of the tuning process. Start here, really.

> Several areas of the vehicle should always be analyzed before you

> begin the effort.

>

>                                                                i.

> Check base timing, adjust as needed.  On older Fords, pull “spout” timing connector either by distributor (86-93) or on passenger fender side (94-95).  Adjust distributor to achieve 10 degrees base timing with spout removed.  Reinstall spout before tuning.

>

>                                                               ii.

> Evaluate TPS voltage, make sure it is in range through motion.

Vehicles are very sensitive to improper TPS voltage.  TPS being too low or too high can cause the ECM to not enter the correct idle mode.

TPS should be between 0.95 and 1volt with throttle plate closed.  This can be checked using QH quite nicely.

>

>                                                             iii.

> Look at MAF intake routing, make sure there are no gross vacuum / intake leaks.

http://support.moates.net/tuning-maf-systems-and-air-leaks/

See how much or little of that you want to put here.

>

>                                                             iv.

> O2 sensors should be operational, exhaust should be leak-tight at

> least that far back.

OEM Ford O2 sensors work a million times better than cheap aftermarket ones.

Ideally, a wideband sensor is to be installed in addition to the factory O2s rather than instead of one.

If this is not possible, it is greatly preferable to remove a secondary (Post-catalytic converter) O2 sensor.

If a primary O2 sensor has the be removed in order to install a wideband, make sure closed loop operation is disabled.

>

>                                                              v.

> Basic maintenance should not be overlooked.

>

> 1.       Plugs and wires

1a. PLUG GAP IS REALLY IMPORTANT

1b. Appropriate plug type is really important (Copper, Silver (Brisk for 3v)).  Iridium plugs are ok for applications with extremely strong spark boxes or CDI systems.  Avoid platinum plugs like the plague.

>

> 2.       Oil and coolant

>

> 3.       Fuel filter and fuel age/quality/octane

>

> 4.       Clean air filter and MAF

>

>                                                             vi.

> Ensure that fuel pressure is as expected through operating range.

>

> Remember, you can’t fix mechanical or electrical issues with reprogramming.

> Tuning is about more than just flipping chips, so make sure your

> vehicle is in good shape!

This really can’t be stressed enough.  Tuning a car that isn’t running right is like putting a bandaid over a gangrenous wound!  The first step to tuning a car properly is to make sure it is mechanically sound!

>

>

>

************I’m not sure I would get into datalogging just yet because we haven’t talked about recalibration yet.****************

> Datalogging: What’s important and what does it mean? What should we be

> interested in? What to select?

>

> RPM

> MAFV

> Kg/Hr

> Spark

> HEGO1/2

> TPS

> ECT,IAT

> Load

> WBO2

>

***********************************Snip*********************************************************************************************************

>

>

> Recalibration: Modifying Parameters and Values

>

The purpose of recalibrating an ECM is to produce the behavior you desire, and by doing so hopefully improve performance, emissions or other operating characteristics.  Normally, there are two stages to this process.

First, parameters within the strategy are altered to match physical parameters of the engine.  Engine displacement, injector size are the primary values here.  Also, the MAF transfer function should be altered to match the MAF that is installed on the vehicle.  You can often “rob” a MAF transfer function from another vehicle’s strategy when using the MAF from another vehicle.

Next, operating parameters are changed in order to achieve the actual running conditions desired for the particular engine.  In many cases, simply adjusting the “configuration” items for the strategy in the first step will make then engine run great but there are almost always small changes that can be made to optimize performance.

>

> What are the most common values we will need to modify?

>

i.     Displacement – how large the engine is

ii.      Injector slopes – define how much fuel flows through

injectors, aka injector size

iii.      MAF calibration – defines how much air enters the engine as

a function of MAF voltage.  aka MAF transfer function iv.      Rev limiters – protect the engine from being damaged by over-revving

v.      Speed limiters – protect the driver from his/her own stupidity

vi.      EGR delete, PATS delete, secondary O2 delete – turn off items that are not present or not desired.

>

> How do we know which values to change, and by how much?

>

(repeat / correlate with above)

First step: calibration data should match actual equipment specification

example: If you have a 347 stroker with 30# injectors your strategy should be configured to match these physical parameters

Next step: start your engines, identify problems and goals.  There are hundreds (if not thousands in some cases) of parameters you can change.  Before starting on tuning, it’s good to have an idea of what’s not right, what you’d like to improve and what you can leave alone.  This may sound basic, but maintaining some kind of focus is really important to working effectively.  Examples of things you might want to work on are improving idle, improving wide open throttle performance, decreasing fuel consumption.

After figuring out what aspects of running the engine you want to work on, it is time to get the data you need to achieve your goals.  By selecting appropriate items for datalogging, the QuarterHorse allows you to view, log and replay the same data that your ECM uses to run your engine.  Instead of blindly guessing which values you need to change in order to get the engine behavior you seek, you can use this process of logging, analyzing logged data and a little math to make appropriate changes.

Now specific tasks in the tuning process will be examined in detail.

This will be presented as a mixture of theory and practice.  The next chapter will serve as a guide for how to adapt the programming of your ECM to suit specific modifications (cold air kits, injectors, motor transplants, etc) and will be attempt to be primarily hands-on.

Routine tuning processes: (these are going to need more explanation, I’m just running out of steam tonight)

Basic setup – Slopes, injectors, MAFs, sane spark tables

WOT / Open loop fueling – MAF transfer, inj slopes, stabilized fuel table

Closed loop fueling – O2 trims, MAF transfer

Power tuning – Dyno, spark tables

Idle tuning – idle RPM drive, neutral, Drive idle air, neutral idle air, integrator, gains, etc

Dashpot – role, tuning, scalars, preposition

>

>

>

> Chapter 6:

>

CASE STUDIES AND HANDS ON PRIMARILY.  Theory / processes in previous chapter

>

>

>

>

>

> Key Issues and Vehicle-Specific Examples

*MAKE MORE SPECIFIC*  General procedures covered above

>

> How do many of the popular modifications on these vehicles affect the

> tuning approach?

>

>                                                                i.

> Bigger MAF

>

>                                                               ii.

> Bigger injectors

>

>                                                             iii.

> Cold plugs

>

>                                                             iv.

> Nitrous

>

>                                                              v.

> Gears and converter

>

>                                                             vi.

> Auto vs Manual

>

>                                                           vii.

> Emissions delete / racing modifications

>

>                                                          viii.

> Cam, heads

>

>                                                             ix.

> Headers/exhaust

>

>                                                              x.

> Cold air intake

>

> We look at a walk-through of important considerations and the thought

> process of tuning several different example combinations, with

> real-world dyno results.

>

>                                                                i.

> A9L/GUFB Fox Body, 1993 N/A 331 stroker, 24# injectors, cam, headers, 5spd.

>

>                                                               ii.

> CBAZA, same as above.

>

>                                                             iii.

> 03/04 Mustang

>

>                                                             iv.

> SC A9L

>

>                                                              v.

> SC

> 03/04 Cobra

>

>                                                             vi.

> F150 Truck

>

> Achieving an Optimized Result: When is it good enough?

>

>                                                                i.

> What are your goals?

>

>                                                               ii.

> Do you plan for future modifications?

>

>                                                             iii.

> Rules of thumb for AFR and timing, NA vs boost.

>

>                                                             iv.

> What is safe vs aggressive?

>

>

Install USB drivers, Configure software, synchronize it with the hardware via USB, and load up initial calibration.
Establish communications, check settings.

F3v2

$
0
0

f3v2_v01F2v2_v02


Overview

The F3v2 is a simple chip for EEC-based Ford ECUs (~86-04) allowing the stock program to be replaced with a tune of your choice.  This unit was introduced in 2016 and replaces the prior F3 chip, which was discontinued due to parts needed to manufacture it no longer being available.

Chips are supplied blank and must be programmed prior to installation.  To install, simply clean contacts of the EEC connector with carb cleaner and a mild abrasive such as scotchbrite or 220+ grit sandpaper, and slide the module on.

It is critical that the vehicle is fully off before installing or removing anything on the J3 port.  Failure to power-off the ECM correctly can result in frying our hardware, your ECM or both!!!  If you have any doubts at all, remove the keys from the ignition 100% or disconnect the battery.  WARNING WARNING WARNING!

Tunes can be loaded through the via the Jaybird or Burn1 /2 and FA (F2A) adapter.  Flash n Burn, TunerPro RT, Binary Editor, EEC Editor (and other?) software can be used to program these chips.

*IMPORTANT* Firmware 5.15 (or higher) is required on Jaybird / BURN1  / BURN2 to program these chips!  You can visit the firmware update page if necessary.

Switching Setup

The F3v2 supports up to 8 programs.  The normal way to use this functionality is to buy the Rotary Switch which plugs into the black 4 pin connector on the module.  Simply turn the dial to change position on the chip – this works to select a program for the vehicle to run off of and also to select a slot to program with the Jaybird/BURN2.

Things to remember:

  • Turn the dial to the spot you want to program before programming.
  • “Erase chip” will only erase the current active slot, not all positions.
  • You can verify each slot with the tune you desire after programming.  This is a very good idea before actually installing the chip.
  • Changing tunes while the engine is running is safe IF you do not change code!
    • No code patches! BAD
    • No strategy changes! BAD
    • Same strategy, different calibration, A-OK.
    • Remember: change calibration not code!


Manual Switching

Like its F3 predecessor, it is possible to manually switch between programs with the F3v2.

Couple things to remember:

  • At our sole discretion, custom wiring for switching may void your warranty.
  • The connector is a Molex latching 4 pin 0.1″ header with male pins, very common.  You can buy a latching 4 pin female header from the usual sources or buy short cables from us to cut up.
  • Do NOT feed voltage into the F3v2!!!  GROUND ONLY!
  • The 4 pin header consists of GND, A2, A1, A0. Whenever possible, use the GND provided on the header NOT a chassis ground!
  • “1” (high, floating, open, unconnected) is the default state.  “0” (GND) on a pin changes that address bit
  • Tunes are binary format, i.e. 000, 001, 010, 011, 100, 101, 110, 111.  “0” on the switch is generally “111” and “8” on the switch is generally “000”
  • If you use a switch or otherwise to ground pins automatically (nitrous?) to switch tunes while the vehicle is running, you must also remember to ground the same pin(s) during programming.

F3v2 switchin


Data Masking and Manual Selections

In addition to supporting 8 independent tunes, the F3v2 adds manual masking control.  It is very unlikely that you will ever need to use this, but we’re documenting it anyway.  This is an advanced feature and you should only use it if you know what you are doing.  Incorrect use of this feature can make an otherwise correctly programmed chip cause fault mode operation as would happen if an invalid tune is loaded or worse.  You have been warned.

While you use 256k bin files (0x00000 -> 0x3FFFF) to program the F3v2, the whole memory area isn’t visible to the ECM.  The memory area has other things in it like RAM, I/O and stuff other than code and calibration.  If the F3v2 were to “answer” over the entire address range called out by the ECM, it would effectively crash the system because the brain of the ECM wouldn’t be able to communicate with other necessary peripherals.  By default, the F3v2 doesn’t respond in certain memory areas in order to let other devices answer on those addresses.  This allows the tune to be changed (addresses it answers to) and other peripherals to communicate in the same memory space (addresses it doesn’t answer to).  These areas aren’t the same for EECIV-32k, EECIV-56k, EECV 2 bank and EECV 4 bank (the 3 possible memory layouts) so it can’t just run a hard-coded set of addresses and work on 86-04 vehicles.  The F3v2 chip has logic to try and automatically detect which memory addresses it should answer on and which ones it shouldn’t.  We’d like to think it gets things right most of the time but you can manually control some aspects of the masking behavior if you think it is necessary.

One important piece of information regarding this: if you PROGRAM a F3v2, all masking will be disabled until you power cycle (i.e. unplug from programmer) the chip.  After a write operation, you will always be able to read the entire 256k address space, regardless of jumper settings!  This is done to ensure that any program written to the chip can be verified in its entirety.  In order to see how masking affects the data presented, you MUST power cycle the chip.  Doing a read after power cycling a chip may present different data and fail a “verify” operation depending on the original contents programmed to the chip.  After power cycling the chip, any data in masked regions will be read as “FF” instead of the data originally programmed in order to be compatible with the Ford EEC memory bus.

There are two jumpers on the underside of the F3v2:

f3v2_jumpers

For sake of discussion, we’re going to call these “inner” and “outer” as they are not labelled on the circuit board.  In this picture, the “Outer” jumper has been soldered to bridge it and the “Inner” jumper is still open.  (Open = factory setting)

Each of these jumpers controls masking a specific region of memory.  When they are soldered, the F3v2 will always present the data you are programming.  When they are not soldered, the F3v2 autodetection logic is active.


The “Inner” jumper controls presenting the region from 0x01E000 -> 0x01FFFF.

  • Not 100% sure on use case for this but it’s there. I’m thinking manual EECV-2bank selection perhaps?

The “Outer” jumper controls presenting the region from 0x03FF00 -> 0x03FFFF.

  • This is the “top” of the single bank used in EECIV and is known to be used by the CBAZA strategy, in which case it would need to be passed through for all settings in the tune to work on the chip.  F3 (first gen) chip adapters had a “bug” when used on CBAZA applications where some settings wouldn’t work – this is why.  Autodetection logic *should* catch the EECIV use case and pass this memory region through but this jumper allows manual control should it be necessary.
  • In EECV 4 bank applications(and maybe EECV2 bank – I’m not sure), this memory area has a special name – the VID block.  The VID block is used to store vehicle-specific settings such as but not limited to VIN, PATS security keys, rear end ratio, tire size and more.  The default behavior of the F3v2 chip is to “pass through” the information programmed in the factory VID block regardless of the data programmed in the chip.  This has been the “standard” behavior for most Ford chips on the market.  If you wished to override the contents of the factory VID block with a F3v2 chip, you would need to solder the outer jumper.  Make sure that you have programmed the chip with a valid VID block from 0x03FF00 -> 0x03FFFF if you solder this jumper!  Failure to do so will cause PATS-equipped vehicles to not start due to invalid anti-theft system data.
  • The picture above shows this jumper soldered to override masking in the 0x03FF00 -> 0x03FFFF region.

Honda Engine Sim

$
0
0

Introduction

The Honda Engine Sim was introduced to allow interactive bench testing of Honda ECUs.  It supplies the signals from the distributor and many sensors so that an ECU can be fooled into thinking it has a functioning, running engine connected when it is safely on the bench.  Controls are simple: on/off switches and knobs to adjust values up and down.  Outputs like injectors, ignition control module (ICM) and solenoids can be observed via LEDs.  This provides a means for testing ECUs outside of a vehicle and observing many common faults such as damaged injector drivers, fuel pump drivers and distributor VR sensor amplifier damage.

All 3 versions of the Engine Sim are covered on this page.  Information on harnesses is provided for each revision.


Version 3.0 – 2019 Production

The third revision of the Honda Engine sim was introduced January 2019.  It is supplied without a power supply or harness.  It has terminal block connections suitable for building a harness using a harness pigtail.  Some of the small annoyances of earlier versions such as injector LEDs that dimly glow when the injector is off have been fixed but it is largely the same unit with an increased number of channels compared to earlier models.  Picture for identification purposes: (note: pre-production prototype pictured.  production PCBs may vary in color)

sim v3 prepro

Sim V3 Power Supply

The Sim v3 is supplied without a power supply – you must supply your own.  The sim has a center-positive 2.1mm barrel jack for power.  Alternatively, wires can be soldered to “CONST PWR” and “GND” instead of the barrel jack.  There is not a single “right” power adapter for this – you could even use a variable voltage supply to investigate behavior of the ECU under different power conditions.  In addition to many “wall wart” style adapters, the 12V rail of an AT/ATX power supply (yellow + black color wires typically) is suitable.

Power supplied to the sim will be supplied to the ECU, through a diode.  This means that whatever voltage coming in will go out, minus 0.6V or so for a silicon protection diode.  i.e. 15V in, 14.4V supply to ECU or 12.0V in, 11.4V supply to ECU.

Sim V3 Wire Harness

The Sim V3 is supplied without a harness – you must construct your own.  You will need a set of plugs from a 92-95 Honda Civic, Accord, Prelude, etc.  It is recommended but not required to strip the connectors down to only the wires to be connected to the sim, removing any pins that will be unused.  In some cases, it may be necessary to add wires to the harness for all Engine Sim functions.  The recommended pins in the harness to use: (image stolen from http://www.ff-squad.com Tech Library, thanks Katman!)


A Plug with wires: (wire colors will vary!)

OBD1 A Plug

B Plug with wires: (wire colors will vary!)

OBD1 B Plug

D Plug with wires: (wire colors will vary!)

OBD1 D Plug

After the connectors have been prepared, each wire needs to be stripped before inserting into the Engine Sim connectors:

OBD1 Plugs stripped

It’s helpful if the wires are approximately the right length to go where they need to.  Putting them next to the Sim can help with this:

OBD1 Plugs and Sim

Insert each wire and turn the screw terminal clockwise to squeeze each wire tightly enough that it does not come out when you gently tug on it.

(insert picture here)

Final result: all wires connected to screw terminals and securely screwed down:

(insert picture here)


Version 2.0 -DISCONTINUED

The second revision of the Honda Engine sim was offered with a connector and harness that could be disconnected and a 12V 1A wall wart power supply.  No spare parts are available for this.  This was discontinued due to poor harness availability and unreliable wiring suppliers.  No warranty service will be offered but you can contact us for trade-in opportunities to current production hardware.  We also are making the harness documentation available so that repairs to existing units can be made.  Picture for identification purposes:

rY

Harness documentation: Engine Simulator Diagram V2

Plastic connector for harness is AMP/Tyco 102387-6  Pins for black sim connector (102387-6) are AMP/Tyco 87523-6.  Both are available from usual electronic parts distributors.


Version 1.0 – DISCONTINUED

The original Honda Engine Sim was offered with the harness hard-wired to the unit and a wall wart power adapter.  No spare parts are available for this.  This unit was discontinued in favor of version 2 with a separate harness.  No warranty service will be offered but you can contact us for trade-in opportunities to current production hardware.  These pictures are offered for identification purposes:

sim v1 prod

Troubleshooting: BURN2 Verification Failed

$
0
0

If you receive the dreaded “Verification Failed” message after trying to program a chip with the BURN2, there are only a few possible reasons.

  1. Fake chips.  There are lots of fake 27SF512 chips floating around.  We have a whole article about this.  If you didn’t buy your chips from us, you need to seriously consider this.
  2. Bad chip.  Try another chip.  If you have the same results from more than one genuine chip, it’s probably not the chip.
  3. ZIF connection. The ZIF socket with the metal handle on the BURN2 is not soldered to the main circuit board.  It’s a press-fit item.  Over time, the action of raising and lowering the handle can work the ZIF loose enough to have issues but not “feel” loose.  Put the burn2 on a flat surface.   Push down on either end of the ZIF with your thumbs firmly to try and re-seat the socket.  Test again after.
  4. Other solder joints between the DIP32 socket and the PCB can be problematic.  If you feel like touching up the solder on them, feel free.  If not, you can contact us for warranty service.
  5. If you are still having issues, the BURN2 will need repair – contact us to arrange for warranty replacement.


Another problem that isn’t as common but we still see are BURN2s that will not erase a chip.  After a “Blank Check” operation, the software reports “Chip is NOT Blank”  There are two strong possibilities for this fault:

  1. Fake chips.  The Winbond chips that are most commonly used as fake 27SF512 chips cannot be erased by the BURN2 because they require a different voltage to erase than the 27SF512 chips that the BURN2 was designed for.  If you didn’t buy your chips from us, carefully check to make sure you don’t have fake chips.
  2. Defective voltage  circuit in BURN2.  The circuit that generates the erase voltage in the BURN2 can fail.  If it does, you’ll still be able to read chips but erase operations will fail.  This is not something you can easily repair – contact us to arrange for warranty replacement.

End Of Life Products

$
0
0

While we try to produce and support products for as long as we can, we can’t continue to make things forever.  Often, product changes are prompted by the components required to build a product no longer being available for us to purchase – if we can’t buy the chips needed to build stuff, we can’t sell products.  As a rule of thumb, our limited lifetime warranty will cover any products that we’re currently still manufacturing – we will replace any defective units with a new unit from stock.  If we revise, upgrade or otherwise change a product we will generally offer the upgraded/replacement product via warranty service for a limited time, usually at least six months to a year.  After a product has no longer been manufactured for some time, free replacements may stop at our discretion.

This page serves to document some products that are no longer in production and what their current status is.

  • QuarterHorse version 1 (soldered battery): EOL Date 12/31/2019.  After this time, there will be a $100 charge to upgrade to the current model with a removable battery and keep-alive power supervisor circuit
  • Demon1: EOL Date 1/1/2018.  Demon1 units that fail can be replaced with Demon2 units for $124.50 (half retail price)  Any Neptune license can be transferred to new hardware.
  • Neptune RTP: EOL Date 1/1/2014. Original Neptune RTP boards that fail can be replaced with Demon2 units for $124.50 (half retail price).  Neptune license can be transferred to new hardware.
  • Ostrich 1.0: EOL Date 1/1/2018.  Ostrich 1 units that fail can be replaced with current Ostrich 2 for $87.50 (half retail price)
  • BURN1: EOL Date 1/1/2018.  BURN1 units that fail can be replaced with BURN2 for $42.50 (half retail price)
  • F8: EOL Date 1/1/2018  This product is no longer available and will never be made again.  Please contact us for options in the event of a failure.
  • F3: EOL Date 1/1/2018  This product is no longer available and will never be made again.  Units that fail will be replaced with F3v2 chips for $37.50 (half off retail)
  • F2: EOL Date 1/1/2014  This product is no longer available and will never be made again. Units that fail will be replaced with F3v2 chips for $37.50 (half off retail)
  • G3: EOL Date 1/1/2018 This product is no longer available.  Comparable functionality can be made by using a GX and G1 together.
  • AT29C256: EOL Date 5/24/2006.  This product is no longer available.  Please use C2 SST27SF512 as replacement.
  • CABL2:  EOL Date 7/1/2019.  This product is no longer available.  There are no replacements.  TunerCat sell a compatible unit.

85 Corvette TPI 1226870

$
0
0

Introduction

Unfortunately, the 1226870 is an oddball one-year one-model ECM that was only used on the 1985 corvette.  It is for a TPI setup with an electronically controlled distributor and features 160 baud ALDL communication for logging.  It is a unique ECM.  There are no other ECMs that are a “plug and play” swap without extensive wiring changes. (see “ECM Conversions” below) The ECM uses a 24 pin 2732 EPROM.  A G2 0.6″ chip adapter (solder/desolder install) can be used to install a 28 pin chip or use any of our OBD1 GM tuning gear.

No other masks from other ECMs can be trivially used.  It uses the $1F mask, which is supported by TunerPro RT.

Hardware Required for Tuning

  • G2 Chip adapter and C2 27SF512 chip required to reprogram ECM.  WARNING: This is NOT plug and play!  Desoldering factory chip is required and soldering install for G2 adapter.  (view install)  Order the “Install Service” and send us your ECM if you’re not comfortable with soldering work.
  • BURN2 Chip Programmer programs 27SF512 chips
  • ALDU1 with CABL1 required for datalogging
  • Ostrich2 and SocketBooster 1.0 required for real time tuning
  • APU1 AutoPROM All-in-one device works great (without SocketBooster), taking the place of BURN2, ALDU1+CABL1 and Ostrich2
  • APU1 works great for the application and is the recommended hardware in addition to the G2.

Software Required for Tuning

These computers use the $1F mask from the factory.

TunerPro RT + the $1F definitions works for editing and datalogging.  (this is the recommended software.  It is included with the AutoProm)  Additional/alternate definitions available from Gearhead-efi.com

TunerCat OBD1 tuner with the $1F definition works for editing.

WinALDL works for datalogging.

ECM Conversions

(disclaimer: blatant opinion) The 1226870 is not the high point of OBD1 GM engine management.  It is possible to swap to other ECMs which do better.

1227165 (86-89 TPI MAF) swap

1227730 (90-92 TPI MAP) swap

12200411 (99-02 F body) swap

Ford – Speed Density ECMs

$
0
0

Introduction

The first EFI ECMs used by Ford were speed-density featuring a MAP sensor and either a manual or hydraulically shifted automatic (C4/C6/AOD/etc) transmission along with electronically controlled ignition advance with a distributor.

Later models added AOD-E and E4OD electronically shifted transmissions.

The first generation Lightning trucks came with a speed-density 351 and a E4OD transmission.

These ECMs batch-fire injectors.  Swapping to later ECMs typically provides a slight improvement in fuel economy when the replacement ECM uses sequential injection.

As a rule of thumb, software support is very limited for these models.  These may not be the best choice for a beginner or someone without prior tuning experience.  Be warned.

Strategy/BIN Swapping

While support in general is very limited for these models, there are a select few models/applications that are well-supported.  Fortunately, it is sometime possible to “swap strategies” and use a bin file that has software support in an ECM which otherwise lacks direct support.  Unlike MAF ECMs, the specific combinations of engine components factor highly in each particular speed-density calibration.  Use of a well-supported bin/strategy with a different engine than it was originally intended will often require major tuning due to differences in cylinder count, engine displacement, compression, camshaft.

The easiest way you can figure out which strategies will interchange is to match the hardware ID on the label of the ECM.

C3P1 EFI-SD48B

C3P1 EFI-SD48B HW ID

This is an “EFI-SD48B” ECM.  Any bin/strategy that runs on it (including a first generation lightning C3P1 / LHBL0 / LHBL1 ) will also run on other EFI-SD48B ECMs, and probably EFI-SD48E etc.  I don’t have an exact guide for swapping but if it is very close it’s at least worth a shot.

This document will be published incomplete and added to as I find more information and details.

Supported Hardware-Software Combos

These are known working combinations.

EFI-SD48B family: speed density, E4OD transmission.  Native to Lightning, F150, F250, F350 approximately 1992-1995

  • Box codes C3P1, C3P2, C3p3 (1st gen Lighning), ICY1, T2X1, many more
  • LHBL0 / LHBL1 strategies work
  • Supported by Core Tuning definitions ( www.coretuning.net ) LHBL1 strategy
  • Supported by Binary Editor (maybe?) via LHBL1.xlsx definition (BE website)
  • Supported (maybe?) by Decipha’s speed-density definitions for TunerPro RT ( www.efidynotuning.com )
  • Decipha suggests that the definitions for TunerPro RT will work for “EFI-SD4x” implying that broad strategy/bin swapping is possible

Unsupported/Unknown Hardware-Software Combos


EFI-SD20B – suspect manual / non-electronic automatic transmissions.  Earlier like 90-92 models?  Support unknown.

SFI-SD3 / EA2 1988 Lincoln town car


88-89 Fox Body V8 MAF oddballs: A9S / 8LD

$
0
0

Introduction

The Fox Body Mustang switched to using a Mass Air Flow meter to measure airflow in 1988 in California.  Box codes “A9S” and “8LD” are known examples.  Uses TFI distributor, sequential injection for up to 8 injectors, MAF air metering.  This particular EEC-IV system became the blueprint for the popular A9L / GUFB used by the rest of the Fox body platform.  These early oddball ECMs are very similar to their A9L / A9P / etc. cousins but are just different enough that they require their own unique bin files and definitions.  It is trivially possible to swap a later A9L/A9P/etc. ECM into a car using a A9S/8LD or vise versa.

These ECMs are known to have the hardware ID “SFI-MA2” and it is unknown which other hardware IDs can run the GUFA strategy.

8LD labelonly

Hardware for Tuning

  • QuarterHorse – integrated device brings unique functionality to the table.  It is a “chip on steroids” that allows you to make changes while the vehicle is running and (with supporting software) log live data from the vehicle.
  • F3 – simple chip module that can store one or two tunes and switch between them while vehicle is running.  Requires Jaybird programmer or BURN2+FA.
  • BURN2 + FA + FE – generic chip programmer with Ford adapter (FA) and ECM interface (FE) that can be used to read the current program from EECIV and EECV ECMs on the bench.

Software for Tuning

Although similar to their cousins, these ECMs can only run the GUFA code which uses 32k binaries instead of 56k.  At this point, Binary Editor is the primary software which supports these ECMs.

  • Binary Editor ($100 – $171 available from Moates.net) is a Ford-specific graphically oriented tuning software that supports many EEC-IV and EEC-V processors.  There are several options for BE:
    • Free built-in definitions for BE2012 come with the software.  They’re reasonably complete and work really well.  Support GUFB (A9L, etc.) GUF1 (A9P, etc.) and GUFA (others) natively
    • Core Tuning definition (available through Coretuning.Net) – uses same standards for organization as other Core Tuning defs, very complete.
    • EEC Analyzer ($50 available from Moates.net) is an optional companion program to Binary Editor to assist with analyzing data and automating tuning tasks.

Recommended Combos

Just want to know what to buy?  All of these will be valid combos that will allow you to tune a vehicle effectively.

(Ford Dealer Kit)

(QuarterHorse AND Jaybird AND F3 AND Binary Editor WITH Dongle AND wideband)

(Jaybird AND F3 AND Binary Editor )


About the “Data Trace” feature of our chip emulators

$
0
0

Introduction

The ‘Data trace’ feature of our emulators is probably one of the most misunderstood features.  Trace is intended to give you some idea of what portions of an emulated ROM are being used by the target system as a last resort when you don’t have a way of establishing communications for logging.  Trace is a feature supported only by the Ostrich 2.0 and RoadRunner (with latest firmware).  This article exists to document what Trace is, how it works, what it can do, what kind of limitations exist and how it can go wrong.

In order to understand how data trace works, it is necessary to understand the electrical signals used by a microcontroller in your ECU (or target system) to access RAM or ROM using parallel access.  There are many explanations of this out there but this one seemed decently concise.  It will also be necessary to understand the commands used to set up Trace and the mechanism that the emulator uses to gather and report data back to the PC, along with what happens to that data in the application running on the PC.  It will also be very helpful to understand TunerPro RT definition creation.

Bottom line: Trace is complicated, finicky, temperamental and is not designed to provide the same kind of steady, consistent data that can be obtained through communicating with the ECM using some form of data logging.  Our emulators were NOT designed from the ground up to provide 100% accurate address trace data and we do not expect them to be able to deliver that level of performance.

What Trace is and How it Works

Normal operation of the emulator is the PC sending commands to the Emulator to make changes to emulator memory, allowing changes in a “chip” to be made without having to stop, remove, reprogram and reinstall the chip.  The Emulator has a microcontroller which is responsible for receiving and processing commands from the PC and communicating with a memory controller.  In order to allow changes to be made without disturbing the target system, our emulators sneak updates from the PC in between accesses by the target system.  (If the target expects data too fast, glitches may occur caused by collisions between PC and target memory access.)

Trace allows an application that sends the specific appropriate setup commands to the emulator to monitor which addresses the target system accesses.  When trace is enabled, the microcontroller on the emulator starts querying the same memory controller used for realtime updates to see which addresses are queried by the target system.  In order to determine which memory is accessed, two main signals are monitored by the memory controller:

  1. The address lines on the emulator, used by the target system to specify which data it wants to see
  2. The !OE (Output Enable) and !CE(chip enable) pins, which are used by the target to control the timing of a data output request

After the control lines indicate memory access, the memory controller stores the last address used by the target system.  As fast as it can, the microcontroller retrieves the address information from the memory controller.  Addresses responses are always 3 bytes and take (minimum) 8 MCU clock cycles or around 0.6uS to retrieve from the memory controller.  Setup commands sent by the PC control how the Emulator handles each address retrieved from the memory controller.  It can either store/buffer, send to PC or ignore the received address and wait for another hit.  If you are curious, you can look at the setup command structure in our documentation.  It is possible to control the range of addresses which trigger a match, the number of address hits to gather before reporting to the PC, whether addresses are streamed continuously or reported once before returning to normal control, whether duplicate hits are reported multiple times or once, the format of responses in terms of number of bytes reported and more.

Our emulators communicate with the PC at 921,600 baud 8N1 over a FTDI USB-Serial connection.  This means that approximately 102,400 bytes can be transferred each second, and each byte takes about 10uS to send.  The system is bandwidth-limited because it can gather trace responses from the memory controller faster than it can supply them to the PC.

Software Support

At this point (April 2020) the only softwares that have implemented support for data trace that we know of are TunerPro RT and RenoVelo Domino.  Specific software support for the trace feature is REQUIRED.  An application that supports the realtime tuning / emulation features of our products (i.e. EmUtility) may NOT support trace at all.

While we do not develop it in house, TunerPro RT is our reference platform that we use internally for testing and product development.  There are two methods of using the Trace feature of a compatible emulator in TunerPro RT.

The Address Watch Utility: (Note: it is “greyed out” / unavailable in this screenshot because I didn’t have a compatible emulator plugged in)

TPRT - Address watch utillity


Trace can also be invoked to watch individual tables: (again, “greyed out” / unavailable in this screenshot because I didn’t have a compatible emulator plugged in)

TPRT - A for Address

Looking at the control protocols, an example auto-generated “T” command sent by TunerPro RT to the emulator to set up trace after clicking the ‘A’ icon appears to be

"54 23 00 00 01 01 08 44 38 08 44 73 BC    /      T#.....D8.Ds."
  • Control byte = 23: 0b00100011
  • NO streaming
  • report only windowed hits
  • report all
  • normal addr triggers
  • relative addressing
  • single hit buffers
  • single byte address report
  • windowed report (relative  vs. absolute address reports)


What can go wrong with Trace? / Limitations

I’m sure Trace sounds great, like the perfect solution for ECUs where limited communication is possible.  Unfortunately, there are many ways for trace to go wrong and not act like you might hope or expect it would.

  1. Memory controller limitations: missed hits inside the emulator.  The memory controller does not buffer memory hits.  It only reports the last accessed address.  The speed at which the microcontroller queries the memory controller limits how many hits can be captured.  As discussed, it takes several MCU clock ticks do retrieve data from the memory controller. In ~0.6uS, at least 5x 100nS memory accesses can happen, all of which would be missed by the trace system.
  2. Processing received addresses: missed hits inside the emulator.  It takes time (albeit a VERY short amount of time) for the microcontroller on the emulator to process address hits and decide what to do with them.  As it does not query the memory controller when deciding what to do with an address hit, this limits the speed at which it can query the memory controller and limits how many hits can be captured.
  3. Bandwidth / PC: missed hits due to serial comms.  This bandwidth and latency limitation is inherent to the hardware design and will not change.  There is very limited bandwidth to communicate with a PC compared to the speed of memory access.  It takes around 10uSec to communincate the shortest format abbreviated address hit in streaming mode.  That means around 100 memory accesses (at 100ns) can occur (and be missed) by the target during the time it takes ONE Trace hit to be communicated with the PC.  Multiple byte responses (which will be necessary for larger monitor windows) will require 2 or 3 times as long for communication.  These are best-case figures, assuming streaming mode.  If a single response is sent followed by a new command setup, the latency of the process could be increased by a factor of 20 easily.  (Note: single response is the default monitoring scheme for TunerPro RT commands.)  If a large number of address hits are buffered and then bulk transferred, the latency between each hit is significantly decreased but the time to communicate with the PC is significantly increased, leading to a longer pause in between each group of responses.  Bottom line: serial communication limits the maximum potential address hit capability to a fraction of bus speed.
  4. Addressing mix-ups: software/XDF.   Under XDF … Edit XDF info it is possible to specify chip size, offset parameters.  TunerPro uses the address of the table in the XDF for the start and stop addresses it sends as part of the Trace setup command.  The XDF setup parameters control the relative location of tables within TunerPro’s memory model.  These need to be specified in a way that the addresses TunerPro RT uses for representing the bin on your PC match how the Ostrich stores the bin in its memory.  The addresses matching allows TunerPro RT to match the Trace command responses it receives from the emulator with the correct bytes stored in PC memory and show you which bytes in a table are being accessed.  If the memory models differ, TunerPro RT will never show any bytes in the table being accessed because the responses to the Trace commands don’t match with the information it has in memory.
  5. Memory Shadowing: target system behavior: “Shadowing” refers to the practice of an embedded system copying memory from one place to another before using it.  In many cases, slow flash or ROM chip memory is copied to faster RAM memory and then accessed in RAM during normal operation.  In this style of use, there are no ROM accesses to trigger Trace hits after the initial shadow.  While this does not often happen, it is controlled by the target system and is not under the control of our emulators.

Conclusion

Trace was a “nifty extra” added to our emulators because we could and figured it might be handy in some cases.  We did NOT design our emulators around being able to deliver completely accurate and precise address tracing.  We do not have any plans to improve the data Trace feature.  We do not have any plans to release an emulator that has better trace performance.  Our emulators were designed to take the place of a chip and allow realtime changes – this they do well.  Trace should be considered a “bonus feature.”  Do not rely on it to gather all the data needed to tune an ECU.

Turbo Mopar 85-93

$
0
0

We don’t have a lot of experience with these vehicles but they have a decent community providing tools for tuning the factory ECMs.  Many of the ECMs can directly use 28 pin EPROMs like the SST27SF512 and BURN2 we sell and an Ostrich 2.0 for live tuning.  Other ECMs use 87C257 chips which require a “latch board” to use standard 28 pin chips like a SST27SF512 or 27C256 (or an Ostrich).  These latch boards are available from Meyer Tuned.  The Turbo Mopar EFI Tuning Forum is a good place to start for more information on tuning these vehicles.

Ground loops, or why power inverters can fry things

$
0
0

Quick Explanation / TL;DR: / READ ME

If you have called to ask for help, one of the things we often ask you is, “Are you using a power inverter to power your laptop?  Do you have your laptop plugged in to the wall?”

There is a reason for this, and we see product get killed every year because of it.  If you don’t want the “why” and just want to know what to do, stop reading after this next line (or skip to the more detailed “solutions” section at the end):


DO NOT PLUG POWER INTO YOUR LAPTOP WHILE YOUR MOATES DEVICE IS CONNECTED TO ANYTHING ELSE, LIKE YOUR CAR!!!


Full Explanation Why

Alternating Current (or “AC”) does not rely on ground to operate, guaranteeing only the difference between two terminals and that the voltage periodically changes polarity (plus and minus “alternating”).  AC is what comes out of the wall in most electric grid delivery.  Direct Current (“DC”) is what comes out of batteries and other DC power sources.  With DC, potential stays one direction without changing polarity and voltage produced by a battery is expressed as a positive number of volts.  The negative terminal of the power source is generally assumed to be where you are measuring from when talking about DC.

Ground is not zero volts.  Ground, electrically speaking, is just the place we agree to call zero.  It’s just a convention, a spot to measure from.

AC can have both a negative and positive component with respect to ground.  It can also be entirely positive with respect to ground.  It can also be entirely negative with respect to ground.  As long as the DIFFERENCE between the two AC terminals varies according to specification, they can be valid AC.  For instance, two wires varying between -220 and -100 volts and two wires varying between 50 and 170 volts can both be 120VAC because ((-100) – (-220)) = 120 and ((170) – (50) = 120.  It doesn’t matter that neither of these AC voltages is centered around what we are calling zero volts (“ground”).  In most residential electricity, the “neutral” wire is supposed to be connected to earth ground (literally, a stake in the ground) at the power distribution box but this is not required for AC current to be present – only the varying voltage potential between two points is required even though neutral really is earth ground in most residential electric.

DC is generally (but not always) expressed as a positive voltage with respect to ground.  If you were to reverse your multimeter’s leads and connect the minus lead to the positive terminal of the battery, the chassis (assuming the negative terminal is connected to the chassis) would measure -12V.  The voltage supplied by an ECU to a throttle position sensor is generally 5V, with respect to sensor ground.  If you were to measure the voltage at the TPS sensor +5v supply with your multimeter ground connected to the +12v terminal of the battery, you could expect to see (+5V –  +12V) = -7V instead of +5V.   If you move your multimeter minus terminal to the TPS- pin, you should see +5V between TPS- and TPS+ reference.  The voltage didn’t change – how you observed it changed because of where you chose to call ground.

Ground is just a convention that we agree on.  If you do funny things with ground, you will get strange results.

If you have AC voltage without an explicit ground, you have an infinite number of ways to make DC from it.  In most cases, AC-DC supplies pick a potential in the middle of the AC range and “call it” ground.  They then use electronic components to create a voltage that is always a fixed difference from the AC voltage picked and call this the output.  The AC-DC supply provides BOTH “ground” and “supply” as outputs.  As long as whatever DC load is connected only ever sees these ground and supply terminals, it will operate perfectly as it has a constant voltage potential (DC Voltage).  For most common DC devices (cellphones, laptops, etc.) this is perfectly acceptable because the electrical energy inside the device is largely self contained and it doesn’t need to interface with other devices powered by DC.  For sake of an example, let’s assume that we stick our multimeter minus lead into the ground.  Our AC input measures -60V to +60v with respect to the earth, for 120V total difference.  Our power supply outputs +42V and +30V with respect to the earth.  The difference between the output terminals (+42V, +30V) is +12V, and a 12V DC load would be perfectly happy.

If you have a DC voltage and you want to create a AC voltage, there are also an essentially infinite number of possible ways to do it.  As long as the difference between the outputs measures appropriately and the signal switches like it should, an AC device should function correctly.  If we agree that ground is the negative battery terminal, our power inverter plugged into a cigarette lighter socket on a vehicle receives +12V and 0V from the battery.  It can output a voltage that swings between +120V and 0V.  It can output a voltage that swings between 0V and -120V.  Both of these will be A-OK for something plugged into the power inverter looking for AC because the difference between the AC outputs varies by 120VAC.

So what happens when we take our example AC-DC power supply (supply +60/-60: receive +12V in the form of +42V and +30V) into our power inverter supplying +0V and -120V?  The power inverter is giving a 120V AC output so the AC-DC supply works fine.  The AC-DC supply chooses 18V below max input (+60V – +42V) for its output and 30V below max input (+60V – +30V) for its output.  The AC-DC supply is being fed 0V maximum and -120V minimum.  It outputs 18V below max input (-18V) for its output and 30V below max input (-30V) for its “ground” coming out, which is a difference of +12V (-18V – -30V) so completely acceptable to run our 12V widget that we’ve plugged into the inverter.

But what happens if our widget, powered off -18V and -30V, gets connected by a USB cable to the vehicle?  If we measure all of our supply voltages from the same spot, -30V is a different potential than the terminal of the battery, which we agreed was “0” when we called it ground.  This difference in ground voltage supplied to two devices with a connection in between is called a “ground loop.”  Ground loops happen when two wires that are both supposed to be at the same ground potential get connected together with power supplies driving ground to different absolute voltage potentials.  If you have two power supplies that are trying to push “ground” to two different voltages and you connect them together but they don’t agree about where “zero” is, so you end up with current flowing from “ground” of one power supply to “ground” of the other power supply, trying to equal things out.  Most of the time, the small cables (USB, ribbon, etc.) supplied with our devices which provide the path from one ground potential to the other aren’t cut out for supplying many amps of power than can be supplied by a modern DC power adapter, leading to far more current flowing through wires that were not designed for it.  Heat, smoke and damage are the usual result.

When a laptop is running off battery, the battery provides voltage from chemical energy stored in the battery and the positive voltage output will always be relative to the battery’s negative terminal, regardless of the absolute potential of the negative terminal.  A 12V battery will measure +112V at the positive terminal when the negative terminal is connected to +100V because the chemical energy will create a DIFFERENCE (112V -100V = 12V) in voltage.  This allows the ground terminal to “float” to whatever voltage is convenient, usually determined by whatever the laptop is connected to.  Having a USB cable connected to a device connected to the chassis ground of the car doesn’t result in a lot of current flowing from the laptop’s negative battery terminal to the car’s negative battery terminal because the battery can work with the negative terminal floating, so it isn’t trying to drive ground to a difference absolute potential, only power the laptop with a relative difference in potential.  However, when running off an AC adapter, the AC adapter has to drive ground to a specific potential in order to be able to supply the positive voltage it needs to charge.  This is where the opportunity for things to go wrong starts.
There needs to be two power supplies with two different grounds for chaos to ensue.  This generally means that there is also a AC-DC conversion happening where ground gets “lost” somewhere along the way.  Some examples of two power supplies where things can go wrong:
  • Car battery (12V and ground), DC-AC inverter plugged in to the cigarette lighter(120V AC out with no common ground reference), AC-DC power adapter plugged in to inverter (+18V and “ground”, with ground floating somewhere between the voltages coming out of the inverter) connected to a Laptop with its USB ports connected to AC-DC adapter ground.  Ground loop forms from AC-DC power adapter “ground” through laptop through USB port through USB cable to device connected to car battery ground.
  • Bench power supply (providing 12V and ground) to ECU connected to laptop powered by AC-DC adapter (providing +20V and ground).  Laptop and ECU connected by USB port ground, AC adapter for laptop and AC-DC power supply for ECU trying to achieve different “ground”
  • Car battery (12V and ground) connected to DC laptop charger.  DC laptop charger creates 20V to charge laptop but does so with a “hidden” DC-AC conversion coupled with an AC-DC conversion.  DC goes in, DC goes out but ground is “lost” in a hidden AC conversion in the middle.  By the time DC comes out, ground potential has shifted from ground supplied to it.  Ground loop forms from laptop ground connected to floating ground of DC-DC converter and battery ground of car connected to ECU connected together by USB ground wire.

So why don’t you just isolate all your Moates devices?

If we used isolated communications on all of our devices, you would need to power all of our devices independently of your laptop in order to communicate.  This would mean all our emulators would need the key on to be able to load a program to them.  This would mean you’d need the vehicle powered to retrieve logs from any device that had onboard logging.  When devices were designed, it was decided that the convenience and utility of having the laptop power up the device enough to communicate with it outweighed the dangers and disadvantages of potential ground loops.  For both the laptop and ECU to be able to power a Moates device, there needed to be a shared/common ground.  With a shared/common ground, the possibility of ground loops exists.  For better or worse, this is how things were designed and they’re not changing now.  When connecting to any Moates USB product, you need to be aware of ground loops and the havoc they can cause.

Solutions for ground loops?

What can you do about this?
  • The standard recommendation is “don’t run your laptop on a charger/inverter.”  This allows ground of the laptop (which is connected to pins on the USB port) to float to whatever potential it is connected to instead of being driven to a certain potential by a charging adapter.
  • Another solution is to explicitly tie the laptop’s ground to the power ground supplied to the ECU and link the chargers together, but be aware that whatever wire you use to do this may need to carry a significant amount of current.
  • Using chargers which explicitly reference a common ground potential and don’t try to push ground to two different places would be ideal, but it’s often hard to determine how power supplies are designed prior to purchase.
  • If you have to use two different power supplies (car battery and inverter+AC adapter, two AC adapters, etc.) use a multimeter to measure the voltage between the ground pins with them plugged in and powered.  If it isn’t zero volts, you’re almost guaranteed to have a ground loop.  You can also unplug everything so no adapter is powered and measure the resistance from one ground to another.  It should be low, ideally zero.  Anything more than a single digit number of ohms is likely to give you a ground loop.
  • Using isolated communications is another solution.  These may not be available for all devices but most of our emulators and “active” gear have a 4 pin port for direct communication, which would allow either the BT or Iso options, with an appropriate cable.  (Pinouts are documented.)  The two things we sell to enable this are:
    • Bluetooth interfaces (there are no wires – communications happens over radio energy)
    • The Optoisolator cable. (which uses a device that turns electricity into light to allow communication without an electrical connection)
Viewing all 191 articles
Browse latest View live


<script src="https://jsc.adskeeper.com/r/s/rssing.com.1596347.js" async> </script>